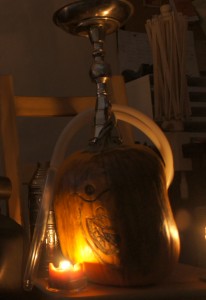
October is upon us and that means it’s time for masked shenanigans and spooky seances while enveloped by creeping fog. Imagine some eerie music and howling wolves on a stormy night. Is that sound swirling around in your head? Do you have goosebumps yet? Good. Now you’re ready to make a pumpkin hookah for your big Halloween bash.
The process is very similar to that I’ve described before in my guide to making a watermelon hookah with some simple differences. Similar to the watermelon hookah you need to choose a pumpkin that is larger than the vase you would normally use with the stem you’ve chosen. there needs to be plenty of room inside for the down stem to fit without touching the bottom and getting plugged.
Choosing the right pumpkin is of great importance. Knock lightly on each gourd and choose one that sounds hollow. That means there is less inside that you’ll have to clear out later. Pumpkins grown for making jack-o-lanterns are great for exactly this reason.
Tipping is always a concern with unconventional hookah bases, so a pumpkin that will stand well on its own without much wobble is absolutely necessary. A wide pumpkin, similar to a vase with a wide footprint, is going to be much more stable. Don’t worry if everyone thinks you’re a weirdo while going through a stack of gourds looking for the one with the perfect balance of features. A few minutes of odd looks is worth avoiding a night of dropped coals.
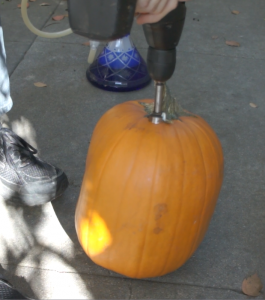
Time for the fun and messy part. Grab your drill with a large Forstner bit. You don’t have those tools? No problem. You can use the method I described in my watermelon hookah guide for pumpkins as well. I just wanted to show you folks a different option and I always jump at the chance to mix power tools and hookah.
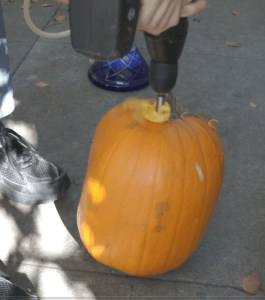
When the pumpkin is standing upright and stable find the top its shape. That’s not necessarily the stem and most often it’s a few inches off from that point. If you can preserve the stem it’s a cool design element to keep, but proper placement of the hole is more important than looking cool as you don’t want a tilted hookah. I’m using a 1″ Forstner bit to drill my hole because that’s the largest size I have available and the bladed quality of the bit makes ribbons out of the pumpkin’s flesh. The hole needs to be a bit bigger to fit my stem, so I carefully use the bit to shave off the sides but touching this up with a sharp knife works just as well. As always, be careful. Things can get slippery when working with pumpkin.
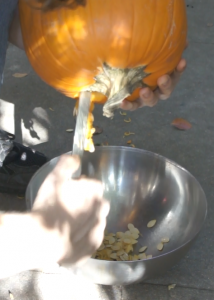
Now comes the exciting task of emptying the pumpkin. Any long utensil that will allow you to scrape the inside walls without cutting them up or punching through will do the job. I’m using the handle end of the grill fork you’ve seen before. This is more about scraping down rather than carving out as it would be with a watermelon, so you don’t have to be as careful. Tip your pumpkin over scrape out the seeds, rinse it out with some water and you’re just about ready to enjoy your new vase.
The last step is to get a proper seal with your stem, which is easiest with finned silicone grommets or by making your own grommets out of wet paper towels. These offer the best seal and are most adaptable to the less than round hole I usually end up carving. just remember that while the seal may be good the grip will not be. Pumpkins are heavy and slippery, so pick up your new vase from the bottom rather than the stem. It’s not as bad as dropped coals but you don’t want your new creation to become pumpkin pie at your feet.
We want to see your pumpkin hookah pictures and videos! Post up your own creations and maybe it will get featured in an upcoming video!