Another chapter in the quest to turn every piece of fruit into a hookah bowl and the Orange hookah bowl is on the chopping block. In this process I change up a few things from my previous fruit bowls that I think I’ll be applying to every one that follows. Read along and see what I mean.
The basic principle behind making any fruit bowl is the same. Cut a bowl shape into one end and then cut a hole through the center and to the other end so it can be fit onto the stem. Where most tutorials suggest cutting the piece of fruit in half to create two hemispheres that look like bowls I’ve tried to think about building the actual structure of the bowl rather than simply the appearance. I’d like to clarify what I mean through the following diagram.
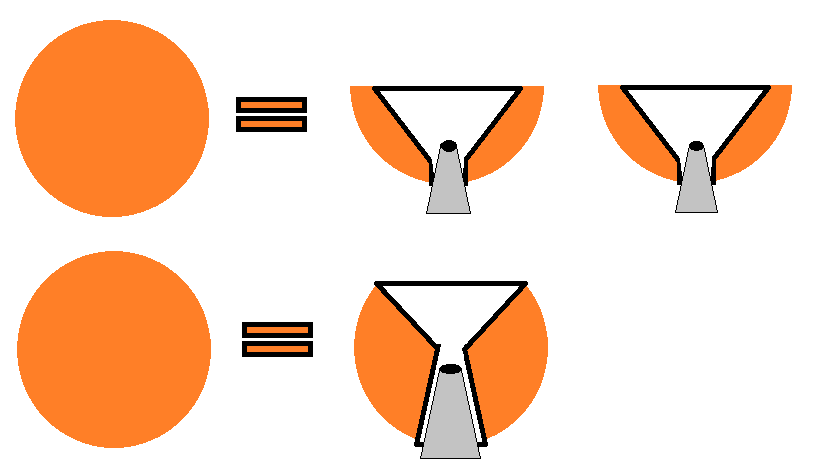
Cut the orange in half and you’re left with too little space to build the bowl and account for the stem. Use the whole piece of fruit in the way I’m about to describe and you’ve got enough room for everything.
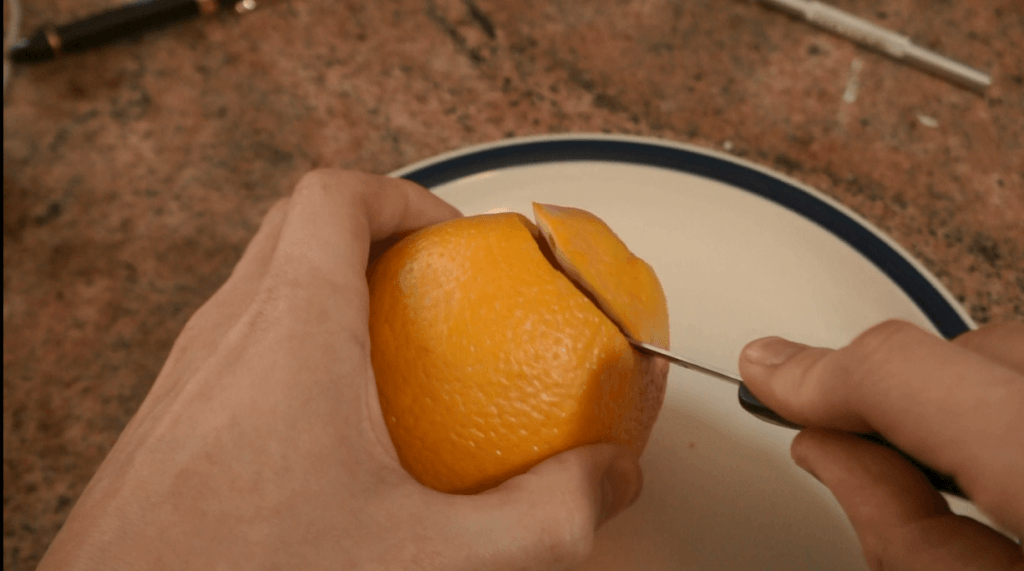
I started by cutting a wide and shallow bowl at one end. I chose the navel end for no particular reason, inserted the blade with a slight angle and cut around the perimeter. The angle of the blade will change the depth of the bowl and I went for something a bit shallow with this cut because I think that gives the best heating properties in a fruit bowl. It’s always better to start shallow and carve a little deeper later because, as with most forms of sculpting, you can always take more off but you can’t put it back on once you’ve cut.
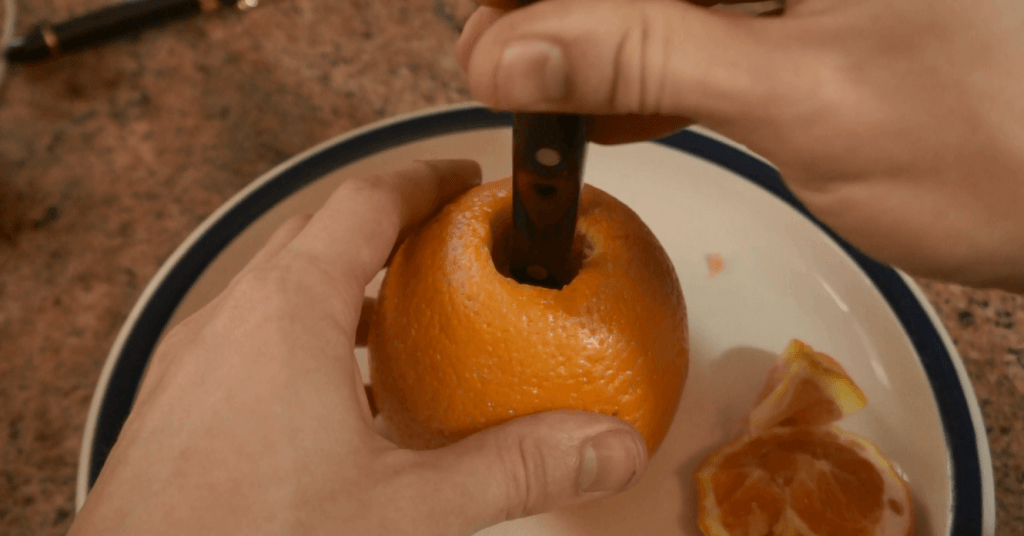
Now we flip to the other side, find the point directly across from the center of the newly cut bowl and make a plunge cut straight through to make sure you are hitting center and give you a mark by which to make your next cut. Try to envision cutting a narrow cone that connects this side of the fruit with the bottom of the bowl you cut earlier. This is most easily done with a paring knife. You want to mimic the interior shape of a normal bowl and the cone shape helps the stem and grommet to make a good seal. Clear the pathway of debris, make any final adjustments and it’s time to pack.

From here you just crumble tobacco into the orange as you would most any other shallow, wide bowl. You should use a large piece of foil to wrap mostly around the orange because there is no lip to help keep it in place. The holes you poke don’t change much, so choose what works best with your tobacco. Remember that a fruit bowl won’t transfer and retain heat in the same way as clay, glass or metal. You’ll need extra heat and a wind-cover really makes a huge difference. I used Nakhla mint, three CocoMazayas with a wind-cover and you can see how well it’s working for me.
The flavor added by the orange is minimal. Very light with a profile more similar to orange essential oil rather than orange juice. I like it but I don’t think it’s worth the effort. If you’re smoking a strongly flavored tobacco you could easily miss it. If the reason you’re making an orange bowl is for the additional flavor you should choose a lighter tobacco that won’t overpower or just use a normal bowl and some good orange flavored tobacco.
For one last piece of advice, pick an orange that’s smaller than the one I chose. The wind-cover seals pretty nicely onto the soft fruit but I’d be happier with it sitting around rather than on the bowl.

That’s the whole process. Pretty simple and very effective. It works as a bowl in a pinch or when you want to get fancy at a party but it’s not my first choice when I sit down for a session.
My IMOTO G1 hookah works way better than this