Time for another introductory class on the hookah. Today we are going to take all the bits and pieces we listed last time and put them together into a functioning rig. From the base to the the bowl, there is a particular order to these things and you want to get it right so you can have the best possible session. Put away your cell phones, take out your notebooks and let us begin.
What is a hookah supposed to do?
The garner an understanding for how the hookah goes together you should understand what this device does and how it functions. To that end I have created this image that shows how air and smoke flow through the rig and exemplifies how it functions.
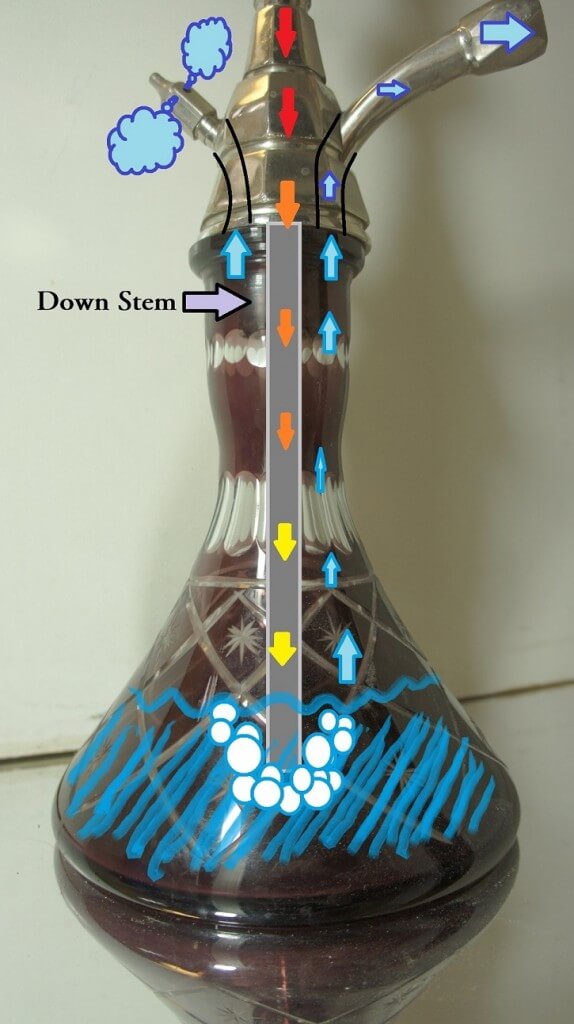
The hookah is a large, one way valve system. Air is drawn through the bowl and down the stem where it comes in contact with the water. The water acts as the main valve allowing the smoke to flow in one direction but not the other. Draw from the hose and you get smoke but blow into it and the water gets pushed a little ways back into the stem forcing the smoke to instead exit through the purge valve. It’s a fairly simple system that relies on having good seals to keep the smoke flowing where it’s supposed to be and keep fresh air from getting in where it’s not.
There are many different opinions on how much filtration the water contact actually provides but we do know that it allows for substantial cooling of the smoke. The water alone does not provide this cooling as the metal stem and the distance the smoke has to travel will allow much of the heat to dissipate before it even reaches the vase. This is the why hookah smoke should be cool and comfortable.
Now that we understand the hookah on a more fundamental level, let’s start from the top down and get this thing assembled.
Packing the Bowl
You may have noticed that there are many different guides for packing bowls on our website. This is because different tobaccos and different bowls require slightly different techniques to smoke optimally. To that end, I suggest reading these guides for more detailed information but here I’m going to go over a basic, fluffed pack that will work in most bowls.
Start by breaking up the tobacco in the package and mixing it all up to evenly distribute the moisture.
Now that the tobacco chunks are loose and evenly coated, simply sprinkle them into the bowl until it is piled just under the rim. Do not pack it down or you may plug the holes at the bottom of the bowl and prevent airflow. This is not a problem with funnel or Crown Classic style bowls but that’s another subject all together.
Foil or Screen
Whether you choose foil or a screen upon which to place your coals, they both serve the same purpose. I have gone over my feelings on the debate as to which is better, so I won’t do that here. Please refer to this article for that diatribe.
The foil goes on the bowl, holes get poked in the foil and charcoal goes on top. Make sure to check out our foil pattern guides to find the right one that works for you. With so many different foil patterns and bowls out there we are still adding new guides, so keep your eyes on the website.
When you apply your foil there should be a small gap (2-4mm) between it and the tobacco. This allows you to properly heat the contents of the bowl without burning it.
Assembly
Now we get to the meat of the matter.
- Fill the base with the appropriate amount of water and place it on a stable surface.
- Make sure that the base grommet is well seated on the stem and gently insert the stem into the vase until the two sit flush together.
- The tray now goes on top of the stem.
- Place your bowl grommet loosely into the bottom of the bowl and press it firmly onto the top of the stem. Don’t push so hard that you risk cracking the bowl. You just need to create a solid seal.
- Place the hose grommet into the hose port and insert the hose. Similar to the bowl, press firmly but not violently.
At this point your hookah is ready to go and you just need to apply heat but it’s worth checking if your seals are working as they should.
Checking for leaks
Before you apply any charcoal to the bowl, place your hand over the foil to prevent air from getting through and try to draw through the hookah. If you can’t draw any air and feel strong resistance then you’re all set. If you can draw some air through the hookah with only minimal effort then you have a leak and need to fix it. While drawing from the hose with your hand over the bowl, you’ll hear a hiss from the point of the leak and that’s where you focus your attention. It may just be an improperly seated grommet.
If you hear just the faintest his and feel strong resistance you’re probably okay. Leaks of such minimal size won’t allow any air through when the bowl is open and clear, so don’t worry about it.
That’s it for part 2
Up next we have the basics of starting a session off right, so make sure to check in as we keep exploring this wonderful hobby.